
The easiest way to understand orienteering is to see it demonstrated in videos. This excellent video will give you a clear picture of what it is all about. Don’t be put off by the super-fit looking people running confidently through forest, most orienteers are not as fit as them! After the video have a look a the summary below of what you need to know to go orienteering successfully.
Video – Start Orienteering – A Newcomer’s Guide – Presented by Graham Gristwood
The video link below takes you straight to it.
This newcomer’s video was produced by SLOW (South London Orienteers) with GB Team orienteers. It links to a series of other videos on techniques, that are included in the skills discussion elsewhere on Better Orienteering (in the Intermediate and Advanced sections). If you are completely new to orienteering then it is probably best to read more below and try having a go at orienteering first, then come back to the SLOW Get Up To Speed video series with a bit more experience.
Here is a summary of what you need to remember when trying orienteering.


You can download a copy of the tips below. It also has a full key to orienteering map symbols which is also included further down this web page. It can be helpful to have a copy of this summary on a smartphone or printed out, to refer to before trying an orienteering course, so that the basics are firmly in your mind before you set off. It is scaled for easy reading on a smartphone screen.
The basics for beginners demonstrated in a bit more detail
Here is a series of 4 videos from MDOC (Manchester and District Orienteering Club) that take you through what we have looked at so far in simple steps and show how you can build up the basic skills in stages.
An example of an orienteering map and course
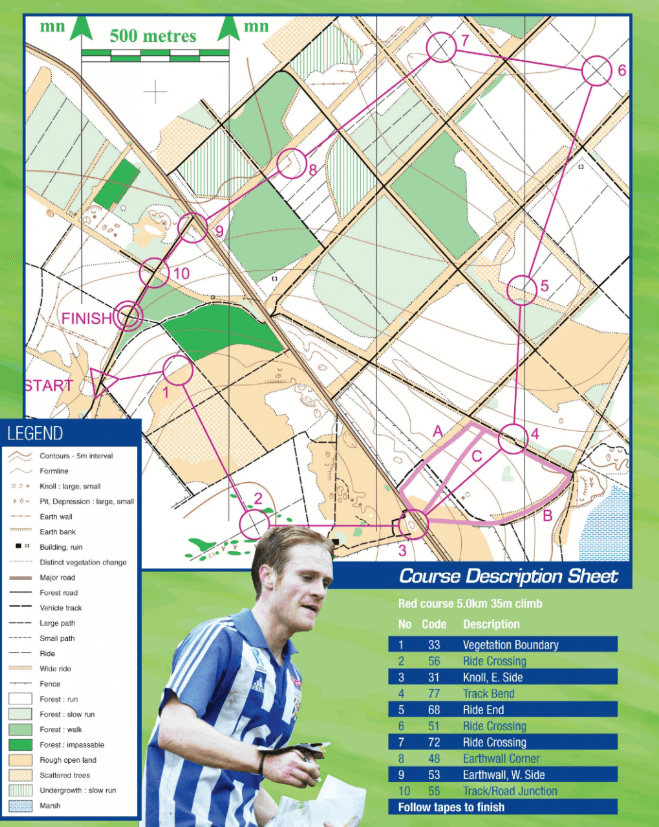
This example map is from British Orienteering’s Newcomer’s guide that sets out the basics of orienteering.
It is important to remember that when viewing any map on a computer or phone screen it will not necessarily be seen at the size it is intended to be printed at. When viewed at the correct size the details should be clear to read.
Some more explanation of how to orienteer
The Irish Orienteering Association has prodcued a series of 10 videos that show in a bit more detail how orienteering works
A model of how to navigate for orienteering
When you have tried orienteering and want to get better, this simple navigation model will help you put these ideas into practice – Plan, Picture, Direction, (Distance)
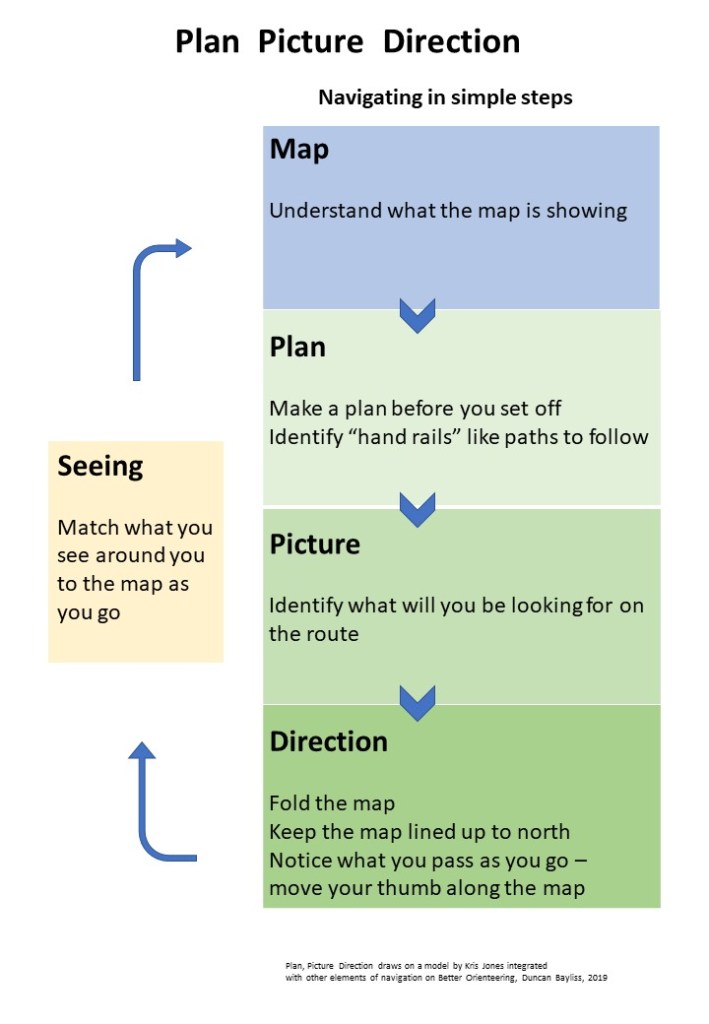
Plan, Picture, Direction explained. To get round an orienteering course successfully, for each leg of the course you should:
Plan – Make a Plan before you set off. Try to follow hand rails such as paths.
Picture – identify what you will see on the way. For example – I will follow a path to a junction and turn into the woodland from the open land on another path. I will see the control where the path crosses a stream.
Direction – Head in the right Direction following the map always keeping it orientated to north with the compass so it matches the terrain around you. Note key features you pass on the way and relate them to the map as you go. Fold the map, and move your thumb along keeping track of where you are.
Be aware of the Distance you have to go from the map and the distance you have covered on the ground. On an orienteering map at 1:10,000 scale 1 cm on the map equals 100 metres on the ground. Estimating distance, it is a skill that improves quickly as you use orienteering maps
Plan, Picture, Direction – 3 simple steps!
This is all explained in more detail in the Basic Navigation Routine section.
What if I get lost?
Getting lost is something people often worry about when they first try rienteering but it is much less of a problem than you might think. Orienteering courses are graded according to difficulty and beginners courses are intended to have some challenge to them but are designed so that you can successfully complete them. Then as you get more experience you can try more difficult courses. Don’t worry if you do get a bit lost, getting a bit lost is normal. On a beginner’s course it should be easy to refind your place on the map. Just follow this process –
If you can no longer match the map to the terrain around you STOP and work out where you are. Here are some basic steps that will help you get back on track matched to the word STOP.
S – Stop! don’t keep going and make it worse!
T – Trace where you have been on the map
O – Observe what significant features are around you and Match them to the map
P – Plan again – Remember the Plan, Picture, Direction model
If you can work out where you are, then you can either continue with your Plan, or make a New Plan.
Retrace -If you are not sure where you are, then it may be necessary to Retrace your steps and try again. Don’t feel bad about doing this if you need to, just continuing will simply get you more lost. Above all, don’t panic, because you will usually be no more than 200 or 300 metres from your last known point (if you have been following the map as you go). You can always go back to your last known location and try again.
(Thank you Wojciech for suggesting STOP as the way to summarize what to do when you get lost).
More about orienteering maps, symbols and using a compass
The first time you try orienteering you don’t need to worry about the information that follows but as you try a few orienteering courses this will help you.
Types of map
Orienteering races take place in many types of terrain including woodland, moorland and urban areas. Urban maps are usually at 1:4000 scale (every centimetre on the map is 40 metres on the ground), or sometimes 1:5000, showing lots of detail around buildings. Woodland and moorland maps are usually at 1:10,000 (1 cm on map = 100 metres on the ground) or 1:15,000 scale (1 cm om map = 150 m on ground), giving a slightly less detailed view of a bigger area of terrain.
Survey and Cartography by Rod Postlethwaite
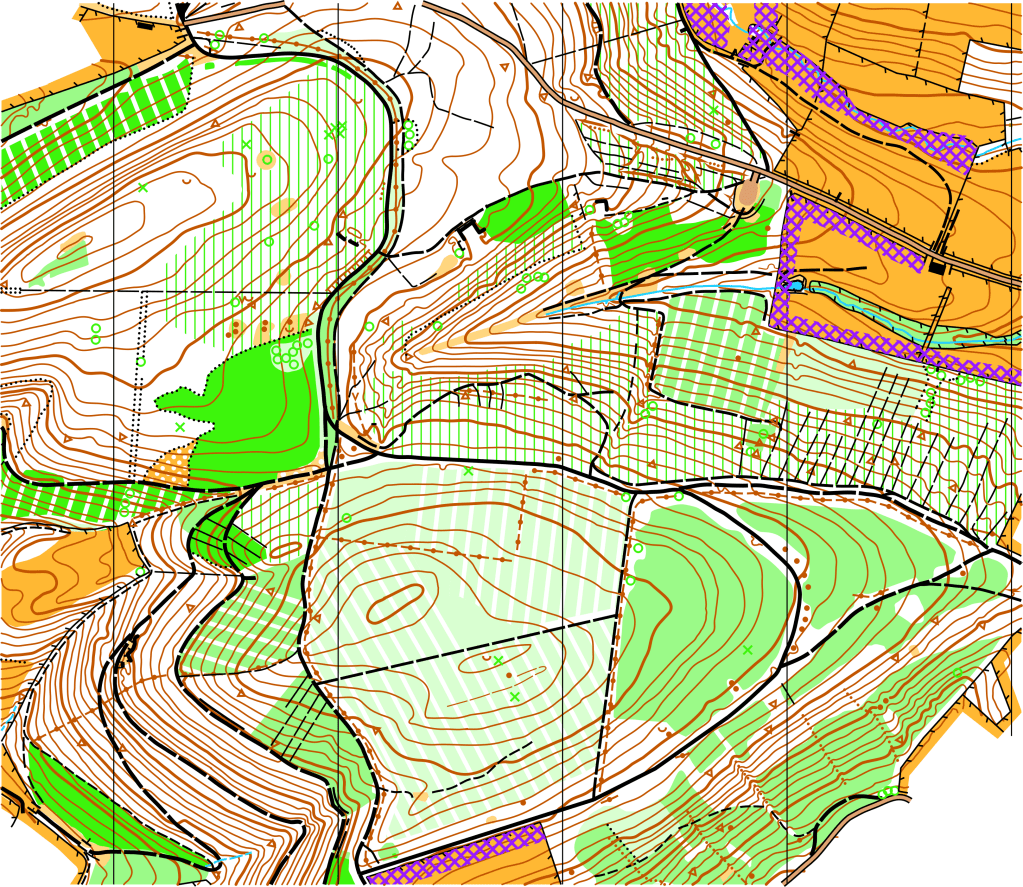
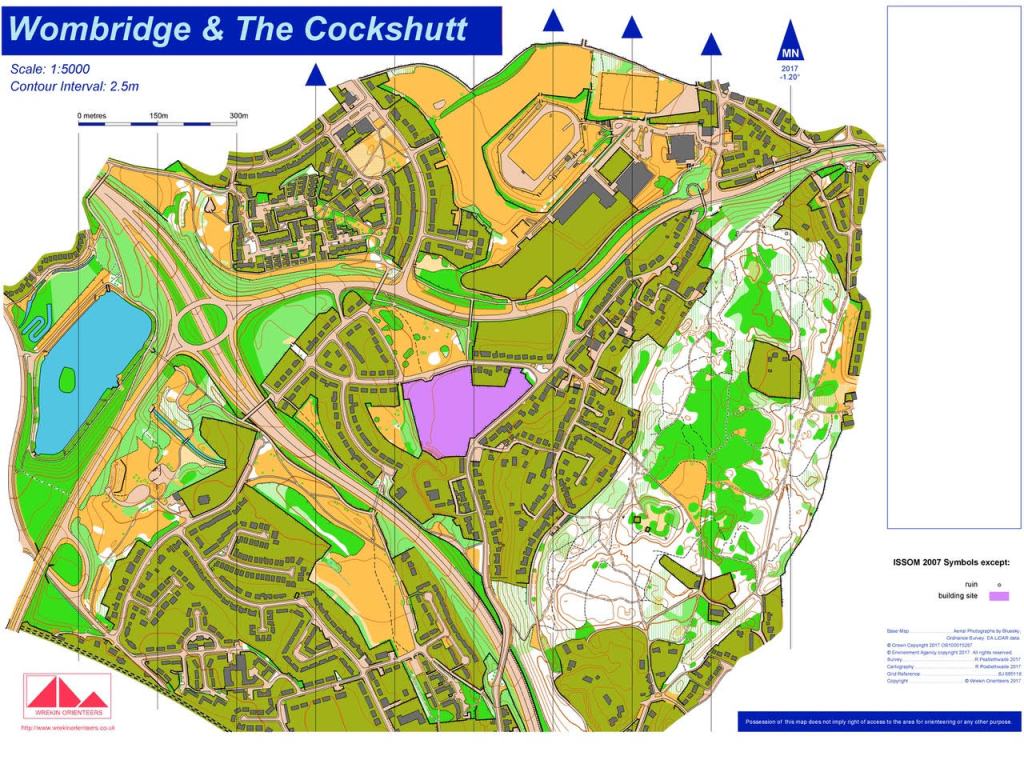
Urban maps such as the Wombridge and Cockshutt map use a slightly different symbol set for urban areas compared to woodland maps. For simplicity the symbol set that is used on all non-urban maps is the one introduced here in the Beginner section.
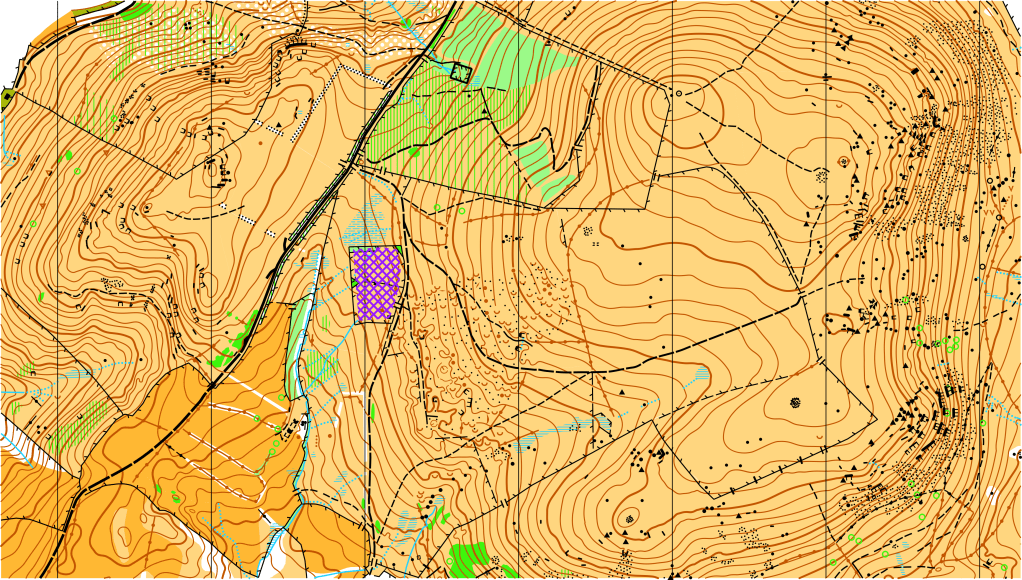
The rough open moorland is coloured a dark yellow. See below for more explanation of map symbols.
Understanding map symbols
Simon Errington at Maprunner has produced a summary of current Orienteering Map Symbols to help you read what maps are showing. You don’t need to know all these symbols straight away and you can refer to the key on the map.
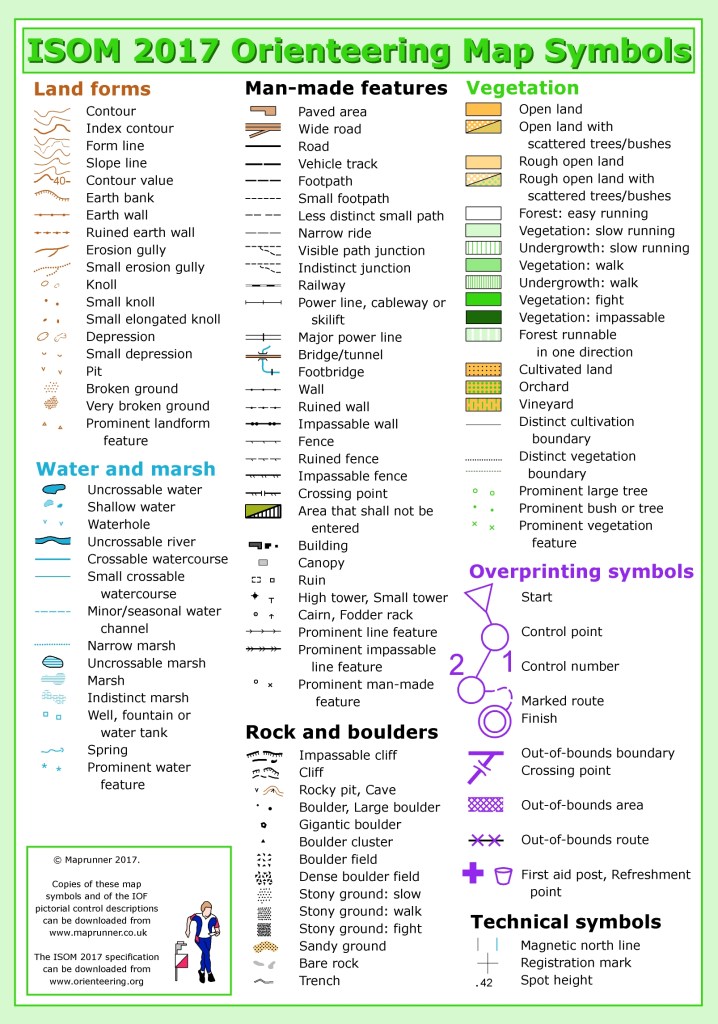
Map symbols download
The most important symbols to remember are:

Yellow is open land
White is forest you can run through

Green is thicker, slower forest. Darker green = thicker forest

Solid black line is a forest road or dirt track

Dashed black line is a path or track. Thicker dashes = bigger path

Brown lines are contours showing land of equal height
You will quickly get used to the other symbols as you encounter them.
Orienteering maps can seem complicated to beginners, but don’t be put off. They are surveyed and drawn to an incredibly high standard to provide an orienteer’s view of the terrain. Once you tune in to orienteering maps you will find they provide all the information you need to choose a suitable route and then follow it reliably.
This video, What is an orienteering map? by Andy Paterson of Clydeside Orienteers, helps to demystify the layers of information that go into making up an orienteering map.
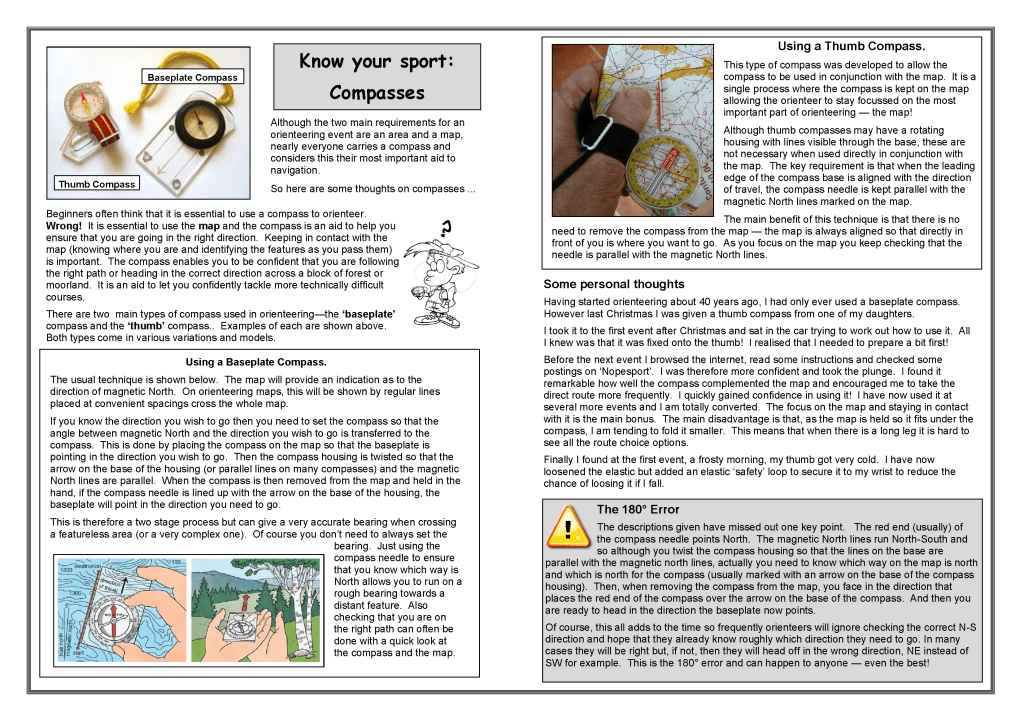
Using the compass
When using an orienteering map you need to keep it lined up with north for the map to make sense of the terrain around you. Thumb compasses are the most popular compasses for orienteering. Most of the time you won’t need to do more than use the red compass needle to keep the map lined up to north, however, this explanation from Silva shows how you can get more from it if you need to, by taking a bearing between points on the map. Silva – How to use a thumb compass
This helpful overview of compasses by David Jukes of BKO covers many of the issues beginners encounter with compasses.
Understanding control descriptions
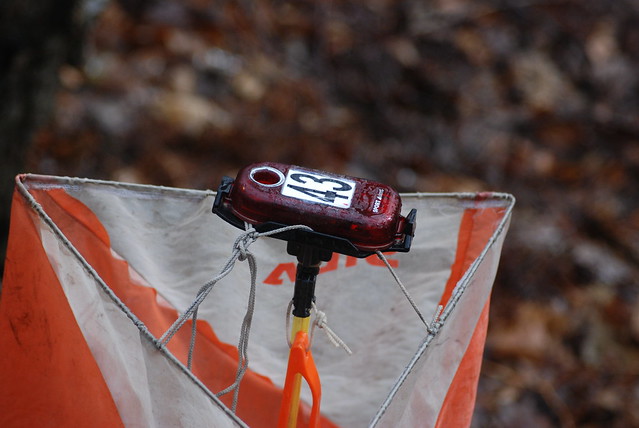
The controls you look for in orienteering courses are described in symbols that are used in orienteering all around the world.
The table below from Maprunner shows what the symbols used in orienteering control descriptions mean.
Beginner’s courses usually have a description in plain English alongside the symbols.
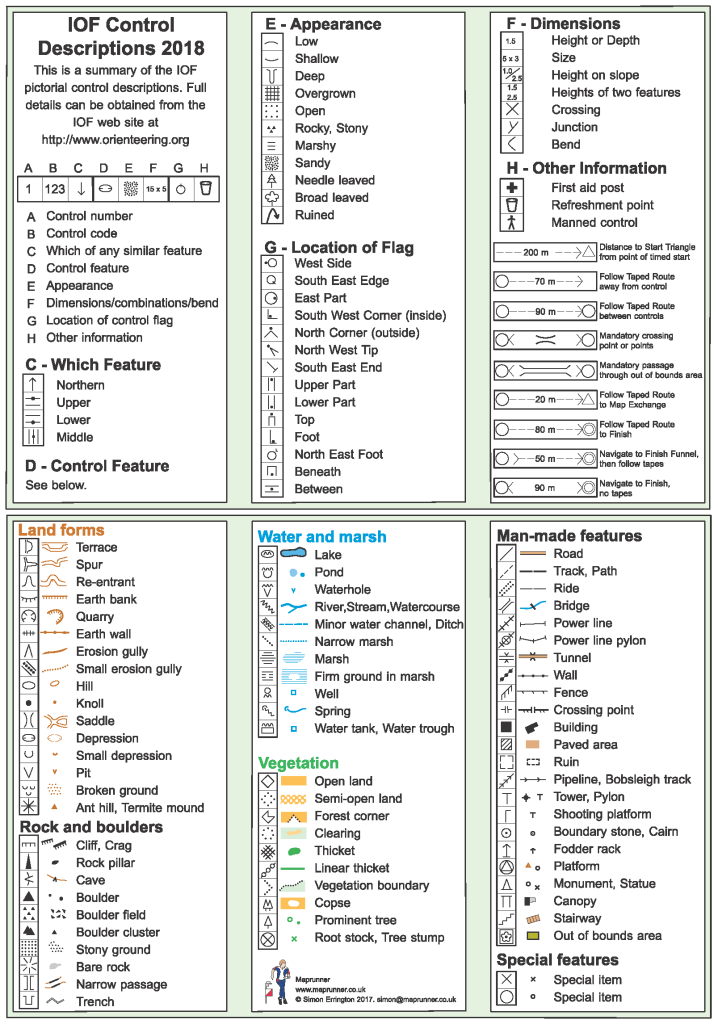
Don’t be put off, these control descriptions symbols become easy to understand very quickly.
How orienteering courses are graded
Orienteering courses are colour coded according to difficulty. The colours used do vary between countries, but you will be able find out when you register which is the right course for you. The colour coding here is the one used in the UK.
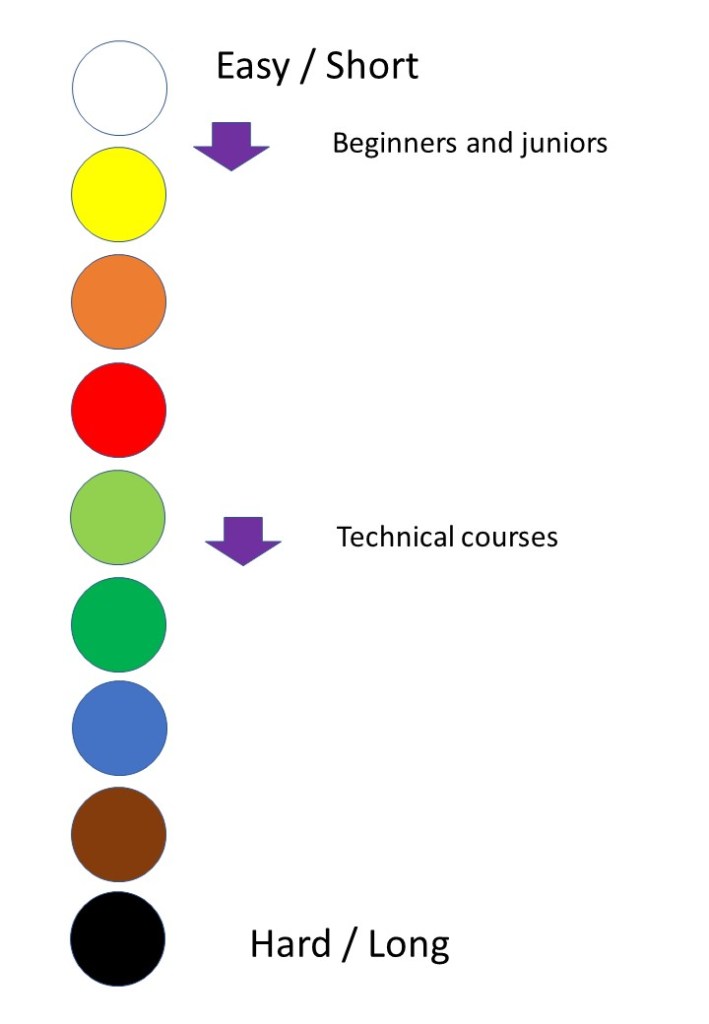
Orienteering is split into courses of different levels of difficulty and physical challenge on a colour coding system, so you will be able to find a suitable course to try. Smaller events follow the colour coding system and you sign up for the course at the race, referred to as ‘entry on the day’. When you register for a course they will help you pick a course that is suitable for your fitness, experience and age group.
The major competitions are split into age classes instead where you will be competing against people of similar age to ensure a fair race.
A bit more detail of the colour coding system and how it relates to the technical difficulty of courses is explained in this leaflet Colour coded courses and technical difficulty by David Jukes of BKO
Major races usually require you to enter beforehand for the age group classes, but they normally have some colour coded courses you can enter on the day as well, typically White, Yellow and Orange.
The age groups for orienteering races go from under 10s to over 90. Juniors are in 2 year age groups up to 21, adults over 35 are in 5 year groups.
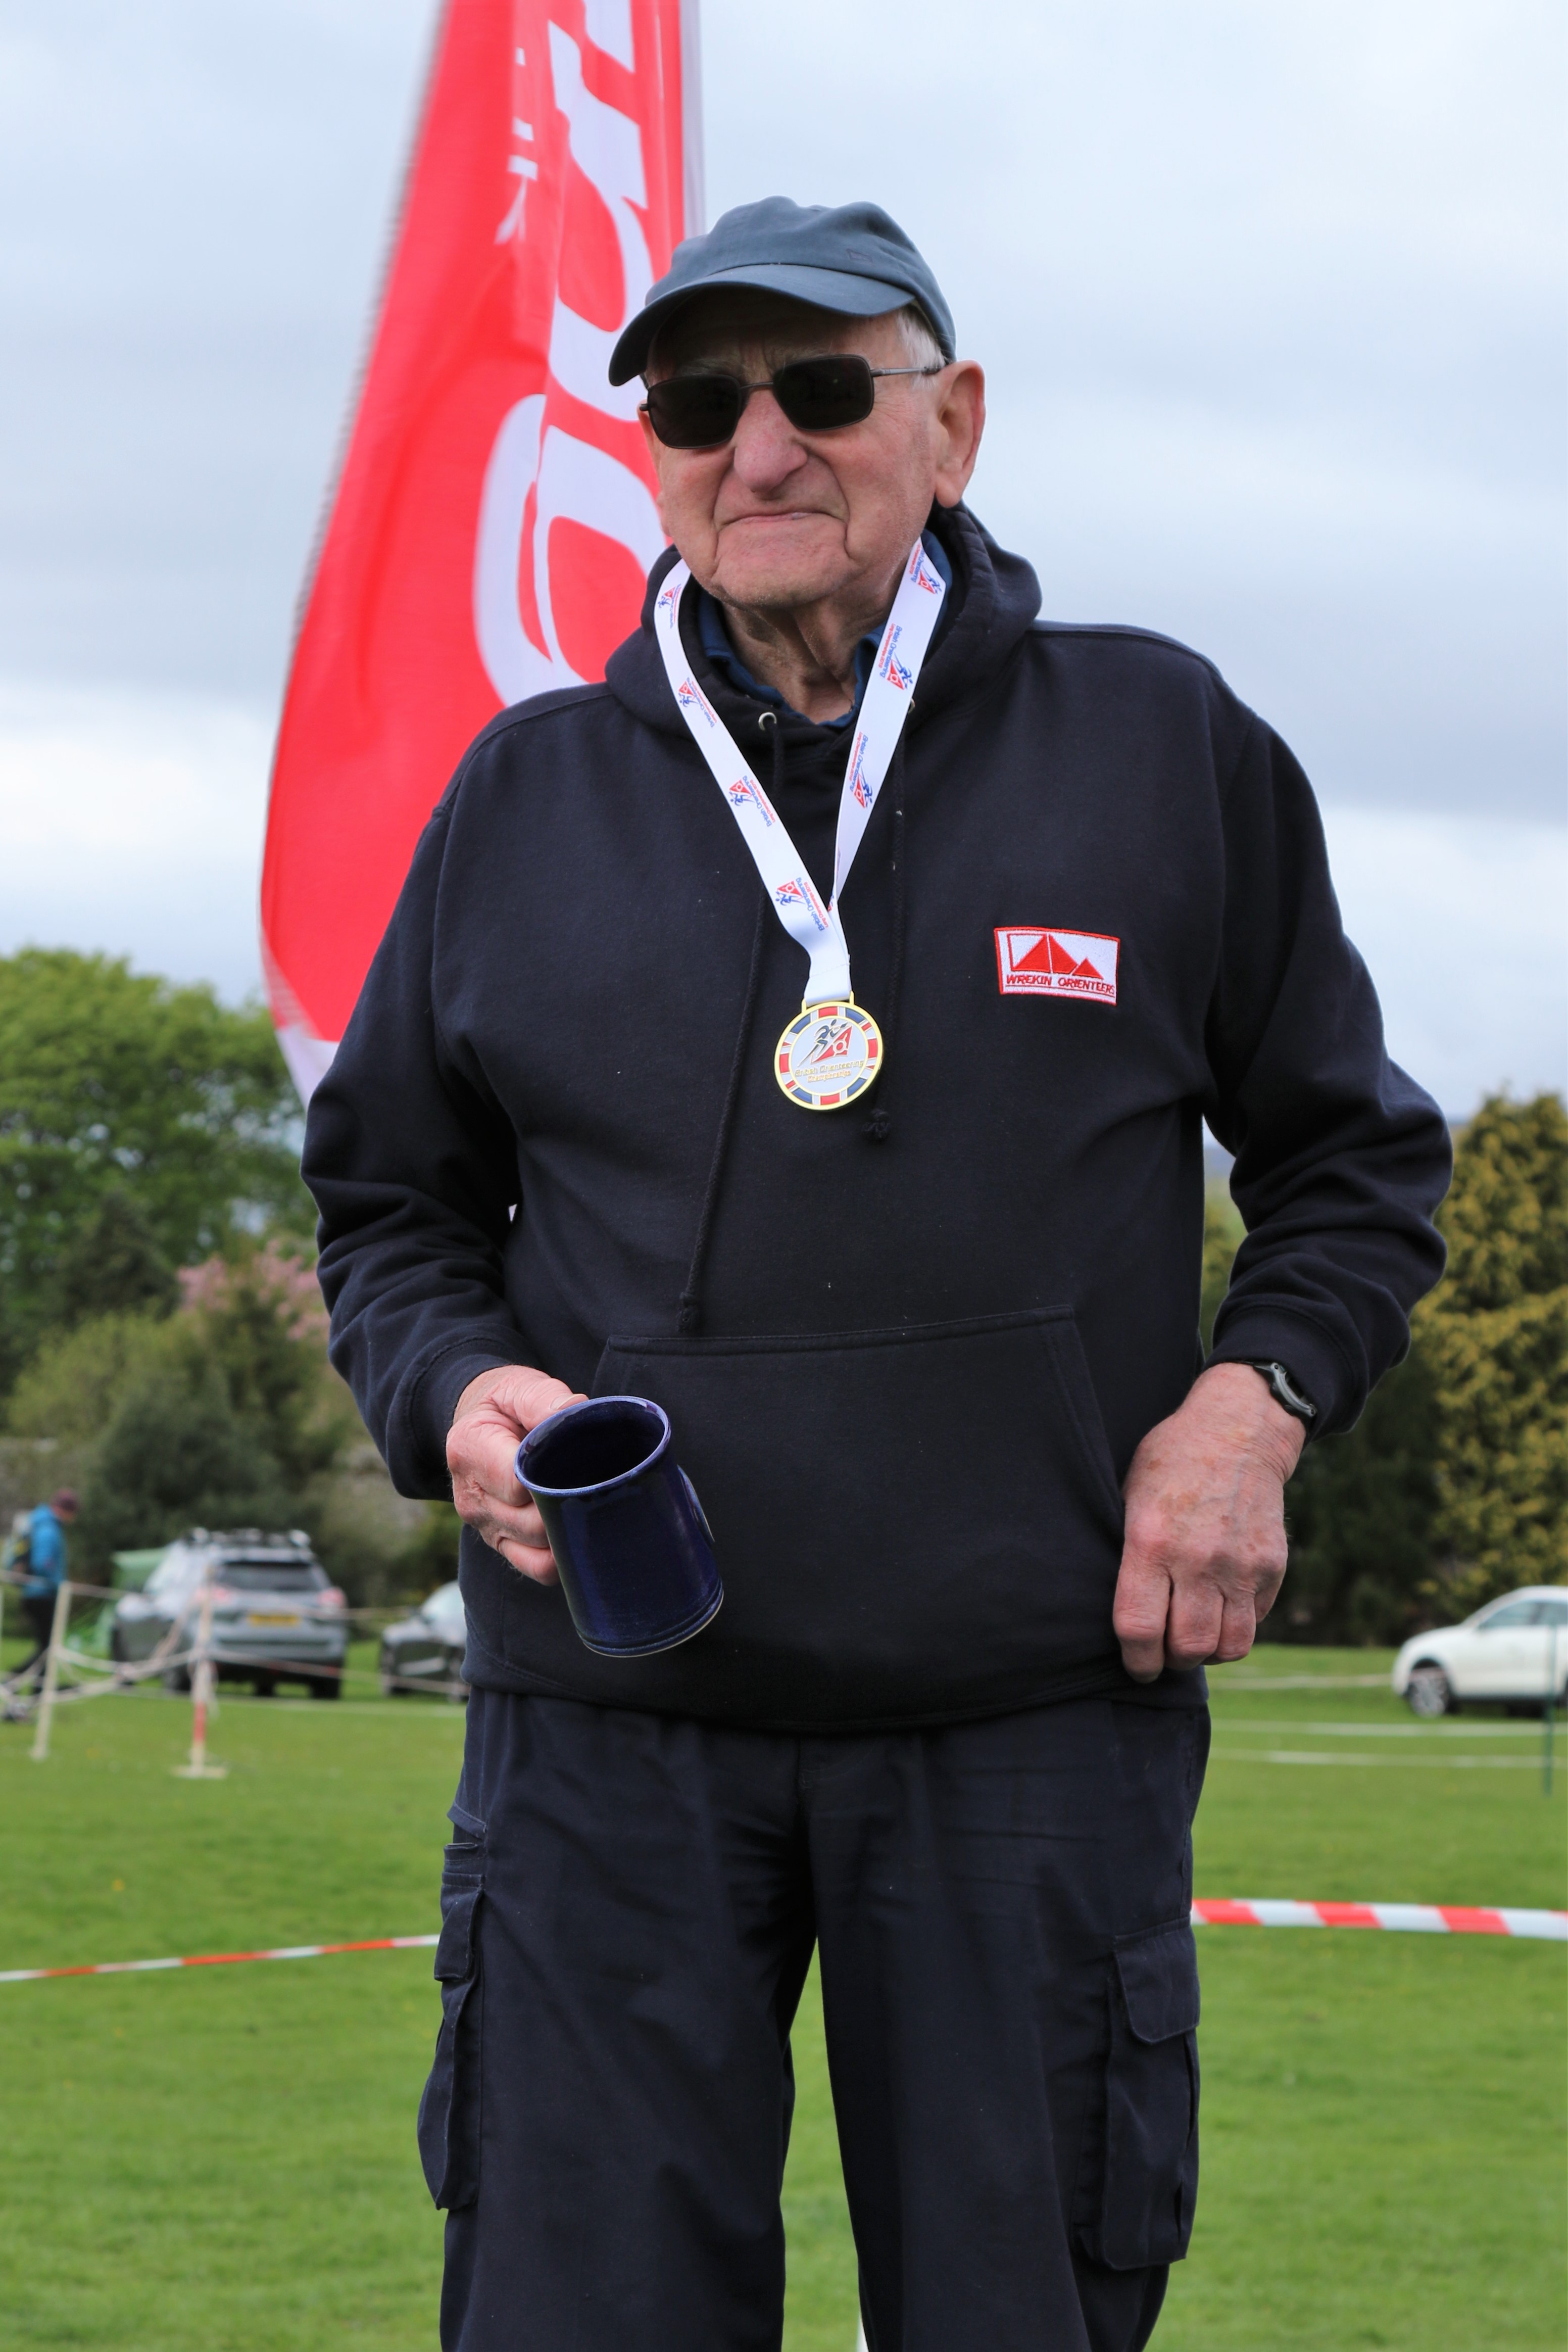
Orienteering is for everyone, as Phillip Broadhead (Wrekin Orienteers) M90 British Champion 2019 proves!
Don’t worry if these ideas are not all totally clear yet – as you try orienteering they will make sense. they are included here to give an idea of what you are aiming for. It will help to look at these videos again after you have tried orienteering, because there are a lot of ideas to take on board. The ten short videos are listed below:
Different types of orienteering
Orienteering competitions are divided into the following types:
Foot orienteering There are races at different distances – Sprint, Middle, Long and Ultra-long – and on different types of terrain – urban, forest, moorland. This summary Long, Middle, Sprint by David Jukes of BKO gives more detail on the differences
Mountain Bike Orienteering (MTBO) – Sprint, Middle, Long
Ski Orienteering (Ski-O) – different distance races
Trail Orienteering (Trail-O Trail-O is for all physical ability levels, even those with significant physical mobility impairments and focuses on accurate map reading rather than running speed. This summary Trail O by David Jukes of BKO gives more detail
Orienteering world-wide
Orienteering may be a world-wide sport, but its homeland is Scandinavia.
This short video from the Swedish Orienteering Federation “Orienteering, more than just running“, gives a flavour of the different types of orienteering you can get involved with. After just a few words in Swedish at the start, it is a well produced video showing footage of people competing at all the types of orienteering available. Hopefully it can inspire you as to the world of navigation fun that orienteering opens up.
An overview of all the types of Orienteering – urban, forest, mountain bike and skiing
https://www.orientering.se/
Where can I try orienteering?
You can try orienteering at one of many races run all across the UK throughout the year. You can also try orienteering at permanent courses you can visit at any time. For countries other than the UK search for your country’s orienteering association web pages for lists of upcoming races.
Have a look at the section Where can I try orienteering?
You now know what orienteering is and how to come along and have a go.
Enjoy trying orienteering and do explore the rest of the Better Orienteering website! There are also free downloads, more videos and links to many resources in the Suggested Reading and Resources section.
A few more beginner resources
The International Orienteering Federation also has 3 introductory videos appropriate for juniors. They take maps and navigation back to absolute basics and can be helpful for juniors and those with little experience of maps as they start out navigating and orienteering.
available at https://orienteering.sport/orienteering/ and linked below:
However, if you are already used to using maps, you can skip these videos and scroll down.
Orienteering Part 1- The Map
The next 2 IOF animated videos are:
Orienteering Part 2- Planning your route
Orienteering Part 3 – Finding your way
